Showing posts with label ombre. Show all posts

Sunday, March 10, 2013

Leopard Ombre Manicure (Tutorial)

 
Hey everyone! I can't believe that this is my first post in 2013 and it's already March.. yikes. I will try to do a better job at keeping up with posting. I'm always on instagram, so if you're interested in keeping up with me, you can find me at @aubreyhannah.
 
 
Onto the nails!
 
I recently posted a small tutorial on my instragram of leopard ombre nails which were inspired by @ohtammm. You all seemed to enjoy them so I figured I would explain how I made them in a little more detail.


Here is my leopard ombre look. I chose to incorporate it as an accent nail, but you could add it to every nail if you wanted! Both ways look great.


Step 1: Paint your nails a neutral or a white shade. Here I used OPI- Barefoot in Barcelona. This will be a base for your ombre colors, and will allow the ombre to fully pop.


Step 2: Take a makeup sponge and dampen it. Wring out any excess water and paint a dark brown, a lighter brown and a white onto it. Here I used OPI- You Don't Know Jacques!, OPI- Barefoot in Barcelona and China Glaze- White on White.


Step 3. Bounce your sponge on top of your nail. The bouncing will lay the colors down and blend them together at the same time. Repeat steps 2 & 3 as many times as it takes to achieve the ombre you're looking for.


Step 4: Once you're satisfied with your ombre, clean up around the edges. You'll notice that the sponge has left your nails with a textured look, to smooth everything out, apply a fast drying top coat. Not only will the top coat smooth out your texture, but it will help the colors blend.


Step 5: Once your top coat has dried, grab a gold polish and apply random dots on your nail. Here I've used OPI- Glitzerland. You can use the polish brush for this, just make sure your brush isn't dripping with polish. You don't want your spots to be too raised.


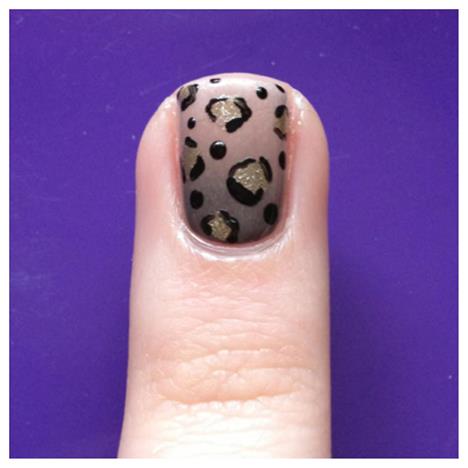
Step 6: Take a black polish, here I used OPI- Black Onyx and line your gold spots. For a more in depth explanation on how I create my leopard print, click here. Once your spots have dried, add another coat of fast drying top coat. Be sure to wait for the spots to fully dry, otherwise the black and gold could bleed into your ombre, ruining all the time you just put into them.


I hope you all enjoyed this quick tutorial. As always, feel free to ask any questions or leave any comments down below.


Happy polishing!
Aubrey

Friday, September 7, 2012

Recent Mani's

Hey guys! I'm here with a little update for you all. I wanted to post my recent mani's since I haven't been showing my blog much love. My main reason for this blog was to focus mostly on tutorials, and I haven't made any lately so that's why I've been M.I.A.

Onto the mani's!!


Here is a golden leopard print mani. If you'd like to see how I create leopard prints, click here. The base color is Orly- Kiss the Bride, the gold is O.P.I.- Glitzerland and the black is O.P.I.- Black Onyx. I used a dotting tool for the dots.


The top and bottom picture are of the same mani which is an ombre one. If you'd like to see how I create my ombre mani's click here. Obviously the bottom picture is a little different. All I did was I added a topcoat&color water marble over top. The top coat allows the ombre to show through, giving it a cool effect. The colors used for the ombre are China Glaze- Purple Panic, China Glaze- Rich & Famous, Pure Ice- Love, and Orly- Kiss the Bride. For my watermarble I used N.Y.C.- Matte Me Crazy and Orly- Kiss the Bride.


Here is my most recent mani that I'm still wearing. It's just a basic mani, nothing too fancy. I have on Sinful Colors- Mint Apple as my base and a couple coats of Revlon- Whimsical overtop. I've also mattified this manicure since the picture was taken and I love it 10x more. I don't know what it is with me and matte polish lately but it's getting out of hand :)


I hope you guys liked this little catch up. If you'd like to be caught up faster, follow my Instagram at aubreyhannah. I post much more frequently on my IG than I do here. Also, I have a really fun manicure planned out for this weekend, I'm hoping that it goes as planned *fingers crossed*


Happy Friday!!
Aubrey

Tuesday, August 14, 2012

Purple Ombre Nails (Tutorial)

Ombre is one of the biggest trends this year. Whether it's ombre hair, ombre clothing, ombre eyes/lips. It's everywhere, so of course it needs to be incorporated on the nails as well :)


Here are my purple ombre nails. The key to a nice ombre is to use colors that are a few shades darker/lighter from each other. You can also create ombre nails from a blue to an orange for example, but the blending process will be a little harder since the colors aren't similar.
If you'd like to see how I did this, keep reading!


What you'll need :


Here I have a matte top coat (optional), 4 different shades of purple and a makeup sponge. From left to right : NYC- Matte Me Crazy, Essie- Nice is Nice, China Glaze- Spontaneous, China Glaze- Coconut Kiss and OPI- Siberian Nights.


Step 1: You'll need to apply a white or nude color on every nail as your base, this will help the next set of colors pop. Wait for this to dry completely. This is OPI- Sweet Heart (it was not shown in the picture above.)


Step 2: Dampen your makeup sponge and wring out any excess water. This will help your polish stay on the surface and not soak so far into the sponge. Take your polishes, and apply a line for each color, going from light to dark.


Step 3: Line your sponge up on your nail and press down. If you like where all of your colors are placed, you can then blend the colors by bouncing the sponge on top of the nail. Be careful. You don't want to over-do it or the sponge will start to pull your color up instead of laying it down.


Step 4: Apply the first coat with your sponge on every nail. By the time you're finished with your last nail, your first one should be dry enough for the second coat. Apply as many coats as you see fit. Here I've applied 3 coats. You'll notice that your sponge will leave a little bit of a bumpy finish (you can see in the picture) But don't worry. Once you add your top coat, it'll even everything out.


Step 5: Clean up time! I like to pour a bit of acetone in the bottle cap and dip my cotton swab into that. It's much more convenient.


Step 6: Once your nails are all clean, you can then add a top coat. As you can see, the nail texture has evened itself out.


Step 7: You can stop there or choose to add a matte top coat like I did. It was hard for me to decide what finish I liked better, so I just ended up sticking with this one!


Hope you guys enjoyed this tutorial. It's simple and the results are pretty! What's better than that?! As always, feel free to leave any comments/questions below.


Happy sponging! ;)
Aubrey