Showing posts with label purple. Show all posts

Friday, September 13, 2013

Floral Water Marble (Step-by-step)

I wanted to do an updated blog post on floral water marbles. This post is going to focus more on the design in the water and less on the actual manicure. If you'd like to check out my previous floral water marble post, click here.
 
What you'll need: A glass to hold your water in (preferably something small like a shot glass), distilled water, nail polish and an orange stick or tooth pick to help create your design.


Step 1: Create a bulls eye with your polish.
This is done by alternating drops of polish into your glass. Your polish will spread and eventually take on a bulls eye appearance.


Step 2: Take your orange stick and gently start from the outside of your bulls eye and drag towards the center. You don't want to dip too far into the polish, just use the finest point of the orange stick to create your designs.
 
* The farther the polish ring is from the center, the dryer it is. It's been sitting on top of the water longer than the other rings. If you notice that the polish is not moving easily, it is most likely because it has already started to dry. Try starting your lines from a ring closer to the center.


Step 3: This time your starting point will be on the opposite end. With the same motion, gently drag towards the center until you meet your two lines together.

* When you create a line, your next line should always be directly across from the one before. (Ex: You start at the top, your next line should be from the bottom. You start from the right, your next line should start from the left, etc). This will help make your petals as symmetrical as possible.


Step 4: Create a line from the outer left and drag towards the center.


Step 5: Create a line from the outer right and drag towards the center, meeting up with all of your other lines in the center. This completes a basic floral water marble and you can choose to stop here if you'd like. I prefer a flower with more petals.


Step 6: For this step, I cut my top-left petal in half, gently dragging towards the center.


Step 7: Since I cut my top-left petal in half for step 6, I will then move on to the opposite side of my design, cutting my bottom-right petal in half and gently dragging towards the center.


Step 8: For this step I cut my bottom-left petal in half.


Step 9: Last step! Cut your last petal in half, top-right. You now have a floral design with 8 petals. You can choose to add more petals if you'd like.


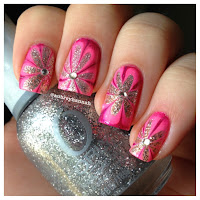
Here is the design as an accent nail on my most recent mani. If water marble nails seem too time consuming, add the design to just one nail like I did here. Quick, easy and gets a lot of compliments.
 
 
As always, feel free to leave any comments/questions below!
Hope you enjoyed this step-by-step!
<3

Friday, August 2, 2013

Vibrant Purple Smokey Eye (Tutorial)

Smokey eyes are great for any sort of night out look. Once you start experimenting with smokey eyes, you realize that there are different kinds. This particular one focuses the dark shadows in the inner and outer corners of the eye.
 
 
This is my vibrant smokey eye of the night:
 
 
Before I get into it, I want to explain some things. The color purple may not be the best color choice for your particular eye color. Whenever you're putting eye shadow on, always try to choose colors that enhance your eyes. Enhancing is the entire purpose of makeup, after all. This purple shade can be switched out for any shade of your liking.


Step 1: Take a vibrant color of your choice (purple looks awesome on brown and green eyes) and place it right in the middle of your lid.


Step 2: With a fluffy brush, add some dark brown to the inner and outer corners of your lid.
 
* You will be adding black shadow, so the purpose of laying down the brown first is so that everything blends together with more ease. Brown is a nice transitional color.
 
* The color used was Buck from Urban Decay- Naked Palette.
Check it out here.


Step 3: With a pencil brush, add some black shadow in the inner and outer corners of your lid. This is the step that you should take your time with. Always start with a little black and work your way to your ideal black shade.
 
* The color used was Crave from Urban Decay - Naked Basics Palette.
Check it out here.


Step 4: Add eye kohl to the top and to the bottom. You could do a crazy cat eye with this, or keep it simple like I did. Both would look great.
 
* The eye kohl used was Smolder by MAC Cosmetics.
Check it out here.


Step 5: Lastly, add your favorite mascara to your top and bottom lashes.
 
* The mascara used was Benefit- BADgal Lash.
Check it out here.


And that's it! If you have any questions or comments, leave them below. If you recreate this look I'd love to see it. Tag me @aubreyhannah on Instagram so I can check them out!


Tuesday, August 14, 2012

Purple Ombre Nails (Tutorial)

Ombre is one of the biggest trends this year. Whether it's ombre hair, ombre clothing, ombre eyes/lips. It's everywhere, so of course it needs to be incorporated on the nails as well :)


Here are my purple ombre nails. The key to a nice ombre is to use colors that are a few shades darker/lighter from each other. You can also create ombre nails from a blue to an orange for example, but the blending process will be a little harder since the colors aren't similar.
If you'd like to see how I did this, keep reading!


What you'll need :


Here I have a matte top coat (optional), 4 different shades of purple and a makeup sponge. From left to right : NYC- Matte Me Crazy, Essie- Nice is Nice, China Glaze- Spontaneous, China Glaze- Coconut Kiss and OPI- Siberian Nights.


Step 1: You'll need to apply a white or nude color on every nail as your base, this will help the next set of colors pop. Wait for this to dry completely. This is OPI- Sweet Heart (it was not shown in the picture above.)


Step 2: Dampen your makeup sponge and wring out any excess water. This will help your polish stay on the surface and not soak so far into the sponge. Take your polishes, and apply a line for each color, going from light to dark.


Step 3: Line your sponge up on your nail and press down. If you like where all of your colors are placed, you can then blend the colors by bouncing the sponge on top of the nail. Be careful. You don't want to over-do it or the sponge will start to pull your color up instead of laying it down.


Step 4: Apply the first coat with your sponge on every nail. By the time you're finished with your last nail, your first one should be dry enough for the second coat. Apply as many coats as you see fit. Here I've applied 3 coats. You'll notice that your sponge will leave a little bit of a bumpy finish (you can see in the picture) But don't worry. Once you add your top coat, it'll even everything out.


Step 5: Clean up time! I like to pour a bit of acetone in the bottle cap and dip my cotton swab into that. It's much more convenient.


Step 6: Once your nails are all clean, you can then add a top coat. As you can see, the nail texture has evened itself out.


Step 7: You can stop there or choose to add a matte top coat like I did. It was hard for me to decide what finish I liked better, so I just ended up sticking with this one!


Hope you guys enjoyed this tutorial. It's simple and the results are pretty! What's better than that?! As always, feel free to leave any comments/questions below.


Happy sponging! ;)
Aubrey

Thursday, August 2, 2012

Purple Pastel Mani

Today I decided on a simple color and no nail art.. pretty crazy huh? I have an interview tomorrow and I didn't want to scare them off with my bright neon pink, blue and green water marbles :)

This is Essie- Nice is Nice, and it's such a pretty color! I'm a sucker for anything pink or purple. This was sent to me by Tamara, aka @ohtammm - If you aren't following her on Instragram then you are missing out my friends! She's amazing!


Don't mind the dryness of my cuticles, I need to give them a little TLC this weekend. My hands have been getting dry lately; maybe it's my body's way of telling me that fall is right around the corner! ;) I'm sure most of you hate reading that but fall is one of my favorite seasons! As much as I love this pretty pastel purple, I love vampy reds and purples even more.


Hope you all love this color as much as I do!
Aubrey

Saturday, July 28, 2012

Purple Water Marble Tutorial

For all of you who don't know what a water marble manicure is, it's a cool way of creating designs using water with your nail polish.

I've made water marble tutorials in the past, but I've never been able to go into too much detail. So I hope this tutorial leaves everyone with all of their questions answered! haha (but of course, feel free to comment below if you do have a question on anything!)

Here are a few examples of water marble manicures..


These all have the flower water marble design.. there are many other designs that you can use, but the flower is my favorite. If you're interested in learning how to make the flower water marble, keep reading.


Step 1: Grab a shot glass and fill it with room temperature water. You don't want it too hot, or too cold.

Step 2: Grab some polishes that you'd like to make a design with. From left to right: China Glaze- Coconut Kiss, OPI- Pamplona Purple, OPI- Pompeii Purple and OPI- Lucky Lucky Lavender.


Step 3: Paint your nails one of the colors that you chose (choose the lightest shade for best results) This is OPI- Lucky Lucky Lavender.


Step 4: This is the fun part! Take your darkest shade and drop a small amount of paint into the water. It will create a circular film on the top of the water.


Step 5: Take your second darkest shade and do the same thing. Let the paint drip off of the brush and into the water.


Step 6: Repeat the same steps with every color. Once you've reached the lightest shade, start over and begin with your darkest shade until you have about 2 rings of every color.

Step 7: You'll know that you're doing it right when your polish drips start to form a bulls-eye effect in the water. Once you get your perfect bulls-eye, you can start designing.

Step 8: Here I'm using a tack to create the design, but you can use anything from a needle to a tooth pick. Anything with a fine tip. Gently glide the tack from the top of your bulls-eye towards the center.

Step 9: Repeat the same movement but this time start from the bottom of your bulls-eye and glide toward the center where your 2 lines will meet.


Step 10: Do the same steps as 8 & 9 except start from each side of your bulls-eye and gently drag inward.


Step 11: Glide your tack through the center of each petal in Step 10's picture. This will give you 8 petals (they won't always be equal width petals, anything that resembles this is great!)


Step 12: Decide where you want the center of the flower to be on your nail. Line your nail up parallel with the water and your desired design and slowly push into the water.
Step 13: It's VERY important to leave your nail submerged until the extra polish floating on the top is cleaned up. If you look at Step 12, you'll see that the film is still there. If you pull your nail up while the extra polish is at the top, it can ruin your design. To clean the film, stick your toothpick into the water and swirl around. The polish will latch onto the toothpick. Once the water is clean, slowly remove your finger from the water.


Step 14: Once you pull your nail out of the water, it'll look something like this. I opted for the center of the flower to be more towards the left side of this nail.


Step 15: Take a cotton swab dipped in acetone and clean up! Once it's clean you can move on to your next nail. When you've finished all of your nails, apply a fast drying top coat to protect your design and add a pretty shine!


This is a final result picture of my purple water marble flowers. It's a lot of fun to make! And once you get the hang of it, they don't take long at all.


I hope you all enjoyed this tutorial, and as I stated earlier, if you have any questions feel free to leave them below and I'll answer them the best I can!

Happy polishing!
Aubrey