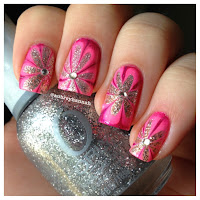
For all of you who don't know what a water marble manicure is, it's a cool way of creating designs using water with your nail polish.
I've made water marble tutorials in the past, but I've never been able to go into too much detail. So I hope this tutorial leaves everyone with all of their questions answered! haha (but of course, feel free to comment below if you do have a question on anything!)
Here are a few examples of water marble manicures..
These all have the flower water marble design.. there are many other designs that you can use, but the flower is my favorite. If you're interested in learning how to make the flower water marble, keep reading.
Step 1: Grab a shot glass and fill it with
room temperature water. You don't want it too hot, or too cold.
Step 2: Grab some polishes that you'd like to make a design with. From left to right: China Glaze- Coconut Kiss, OPI- Pamplona Purple, OPI- Pompeii Purple and OPI- Lucky Lucky Lavender.
Step 3: Paint your nails one of the colors that you chose (choose the lightest shade for best results) This is OPI- Lucky Lucky Lavender.
Step 4: This is the fun part! Take your darkest shade and drop a small amount of paint into the water. It will create a circular film on the top of the water.
Step 5: Take your second darkest shade and do the same thing. Let the paint drip off of the brush and into the water.
Step 6: Repeat the same steps with every color. Once you've reached the lightest shade, start over and begin with your darkest shade until you have about 2 rings of every color.
Step 7: You'll know that you're doing it right when your polish drips start to form a bulls-eye effect in the water. Once you get your perfect bulls-eye, you can start designing.
Step 8: Here I'm using a tack to create the design, but you can use anything from a needle to a tooth pick. Anything with a fine tip. Gently glide the tack from the top of your bulls-eye towards the center.
Step 9: Repeat the same movement but this time start from the bottom of your bulls-eye and glide toward the center where your 2 lines will meet.
Step 10: Do the same steps as 8 & 9 except start from each side of your bulls-eye and gently drag inward.
Step 11: Glide your tack through the center of each petal in Step 10's picture. This will give you 8 petals (they won't always be equal width petals, anything that resembles this is great!)
Step 12: Decide where you want the center of the flower to be on your nail. Line your nail up parallel with the water and your desired design and slowly push into the water.
Step 13: It's
VERY important to leave your nail submerged until the extra polish floating on the top is cleaned up. If you look at Step 12, you'll see that the film is still there. If you pull your nail up while the extra polish is at the top, it can ruin your design. To clean the film, stick your toothpick into the water and swirl around. The polish will latch onto the toothpick. Once the water is clean, slowly remove your finger from the water.
Step 14: Once you pull your nail out of the water, it'll look something like this. I opted for the center of the flower to be more towards the left side of this nail.
Step 15: Take a cotton swab dipped in acetone and clean up! Once it's clean you can move on to your next nail. When you've finished all of your nails, apply a fast drying top coat to protect your design and add a pretty shine!
This is a final result picture of my purple water marble flowers. It's a lot of fun to make! And once you get the hang of it, they don't take long at all.
I hope you all enjoyed this tutorial, and as I stated earlier, if you have any questions feel free to leave them below and I'll answer them the best I can!
Happy polishing!
Aubrey


