Friday, August 2, 2013

Vibrant Purple Smokey Eye (Tutorial)

Smokey eyes are great for any sort of night out look. Once you start experimenting with smokey eyes, you realize that there are different kinds. This particular one focuses the dark shadows in the inner and outer corners of the eye.
 
 
This is my vibrant smokey eye of the night:
 
 
Before I get into it, I want to explain some things. The color purple may not be the best color choice for your particular eye color. Whenever you're putting eye shadow on, always try to choose colors that enhance your eyes. Enhancing is the entire purpose of makeup, after all. This purple shade can be switched out for any shade of your liking.


Step 1: Take a vibrant color of your choice (purple looks awesome on brown and green eyes) and place it right in the middle of your lid.


Step 2: With a fluffy brush, add some dark brown to the inner and outer corners of your lid.
 
* You will be adding black shadow, so the purpose of laying down the brown first is so that everything blends together with more ease. Brown is a nice transitional color.
 
* The color used was Buck from Urban Decay- Naked Palette.
Check it out here.


Step 3: With a pencil brush, add some black shadow in the inner and outer corners of your lid. This is the step that you should take your time with. Always start with a little black and work your way to your ideal black shade.
 
* The color used was Crave from Urban Decay - Naked Basics Palette.
Check it out here.


Step 4: Add eye kohl to the top and to the bottom. You could do a crazy cat eye with this, or keep it simple like I did. Both would look great.
 
* The eye kohl used was Smolder by MAC Cosmetics.
Check it out here.


Step 5: Lastly, add your favorite mascara to your top and bottom lashes.
 
* The mascara used was Benefit- BADgal Lash.
Check it out here.


And that's it! If you have any questions or comments, leave them below. If you recreate this look I'd love to see it. Tag me @aubreyhannah on Instagram so I can check them out!


Sunday, March 10, 2013

Leopard Ombre Manicure (Tutorial)

 
Hey everyone! I can't believe that this is my first post in 2013 and it's already March.. yikes. I will try to do a better job at keeping up with posting. I'm always on instagram, so if you're interested in keeping up with me, you can find me at @aubreyhannah.
 
 
Onto the nails!
 
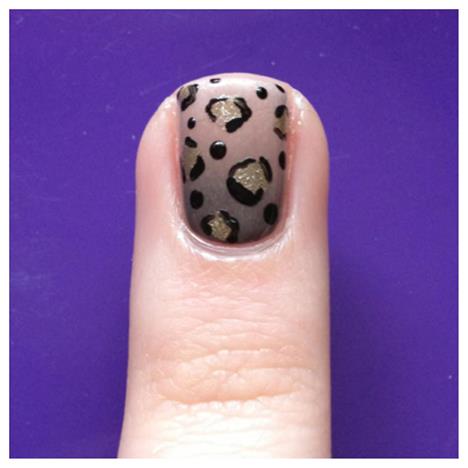
I recently posted a small tutorial on my instragram of leopard ombre nails which were inspired by @ohtammm. You all seemed to enjoy them so I figured I would explain how I made them in a little more detail.


Here is my leopard ombre look. I chose to incorporate it as an accent nail, but you could add it to every nail if you wanted! Both ways look great.


Step 1: Paint your nails a neutral or a white shade. Here I used OPI- Barefoot in Barcelona. This will be a base for your ombre colors, and will allow the ombre to fully pop.


Step 2: Take a makeup sponge and dampen it. Wring out any excess water and paint a dark brown, a lighter brown and a white onto it. Here I used OPI- You Don't Know Jacques!, OPI- Barefoot in Barcelona and China Glaze- White on White.


Step 3. Bounce your sponge on top of your nail. The bouncing will lay the colors down and blend them together at the same time. Repeat steps 2 & 3 as many times as it takes to achieve the ombre you're looking for.


Step 4: Once you're satisfied with your ombre, clean up around the edges. You'll notice that the sponge has left your nails with a textured look, to smooth everything out, apply a fast drying top coat. Not only will the top coat smooth out your texture, but it will help the colors blend.


Step 5: Once your top coat has dried, grab a gold polish and apply random dots on your nail. Here I've used OPI- Glitzerland. You can use the polish brush for this, just make sure your brush isn't dripping with polish. You don't want your spots to be too raised.


Step 6: Take a black polish, here I used OPI- Black Onyx and line your gold spots. For a more in depth explanation on how I create my leopard print, click here. Once your spots have dried, add another coat of fast drying top coat. Be sure to wait for the spots to fully dry, otherwise the black and gold could bleed into your ombre, ruining all the time you just put into them.


I hope you all enjoyed this quick tutorial. As always, feel free to ask any questions or leave any comments down below.


Happy polishing!
Aubrey

Friday, September 7, 2012

Recent Mani's

Hey guys! I'm here with a little update for you all. I wanted to post my recent mani's since I haven't been showing my blog much love. My main reason for this blog was to focus mostly on tutorials, and I haven't made any lately so that's why I've been M.I.A.

Onto the mani's!!


Here is a golden leopard print mani. If you'd like to see how I create leopard prints, click here. The base color is Orly- Kiss the Bride, the gold is O.P.I.- Glitzerland and the black is O.P.I.- Black Onyx. I used a dotting tool for the dots.


The top and bottom picture are of the same mani which is an ombre one. If you'd like to see how I create my ombre mani's click here. Obviously the bottom picture is a little different. All I did was I added a topcoat&color water marble over top. The top coat allows the ombre to show through, giving it a cool effect. The colors used for the ombre are China Glaze- Purple Panic, China Glaze- Rich & Famous, Pure Ice- Love, and Orly- Kiss the Bride. For my watermarble I used N.Y.C.- Matte Me Crazy and Orly- Kiss the Bride.


Here is my most recent mani that I'm still wearing. It's just a basic mani, nothing too fancy. I have on Sinful Colors- Mint Apple as my base and a couple coats of Revlon- Whimsical overtop. I've also mattified this manicure since the picture was taken and I love it 10x more. I don't know what it is with me and matte polish lately but it's getting out of hand :)


I hope you guys liked this little catch up. If you'd like to be caught up faster, follow my Instagram at aubreyhannah. I post much more frequently on my IG than I do here. Also, I have a really fun manicure planned out for this weekend, I'm hoping that it goes as planned *fingers crossed*


Happy Friday!!
Aubrey

Monday, August 27, 2012

Pink Leopard Print (Tutorial)

Hey guys! Sorry I've been M.I.A. for a little bit. I've been focusing a lot of my designated "nail time" for drawing time. Drawing was something that I really loved in high school and I guess I'm starting to pick back up on it.

Since I've been gone longer than I should have, I'm here with a tutorial for you guys, (it's only fair). I've never done a tutorial on leopard print before because it's really so simple. But I figured I'd show you guys how I create the print. A lot of people do it differently than I do, so by all means, add your own individual touch to it.


This is the pink leopard print mani :


If you'd like to see how I made this, keep on reading!


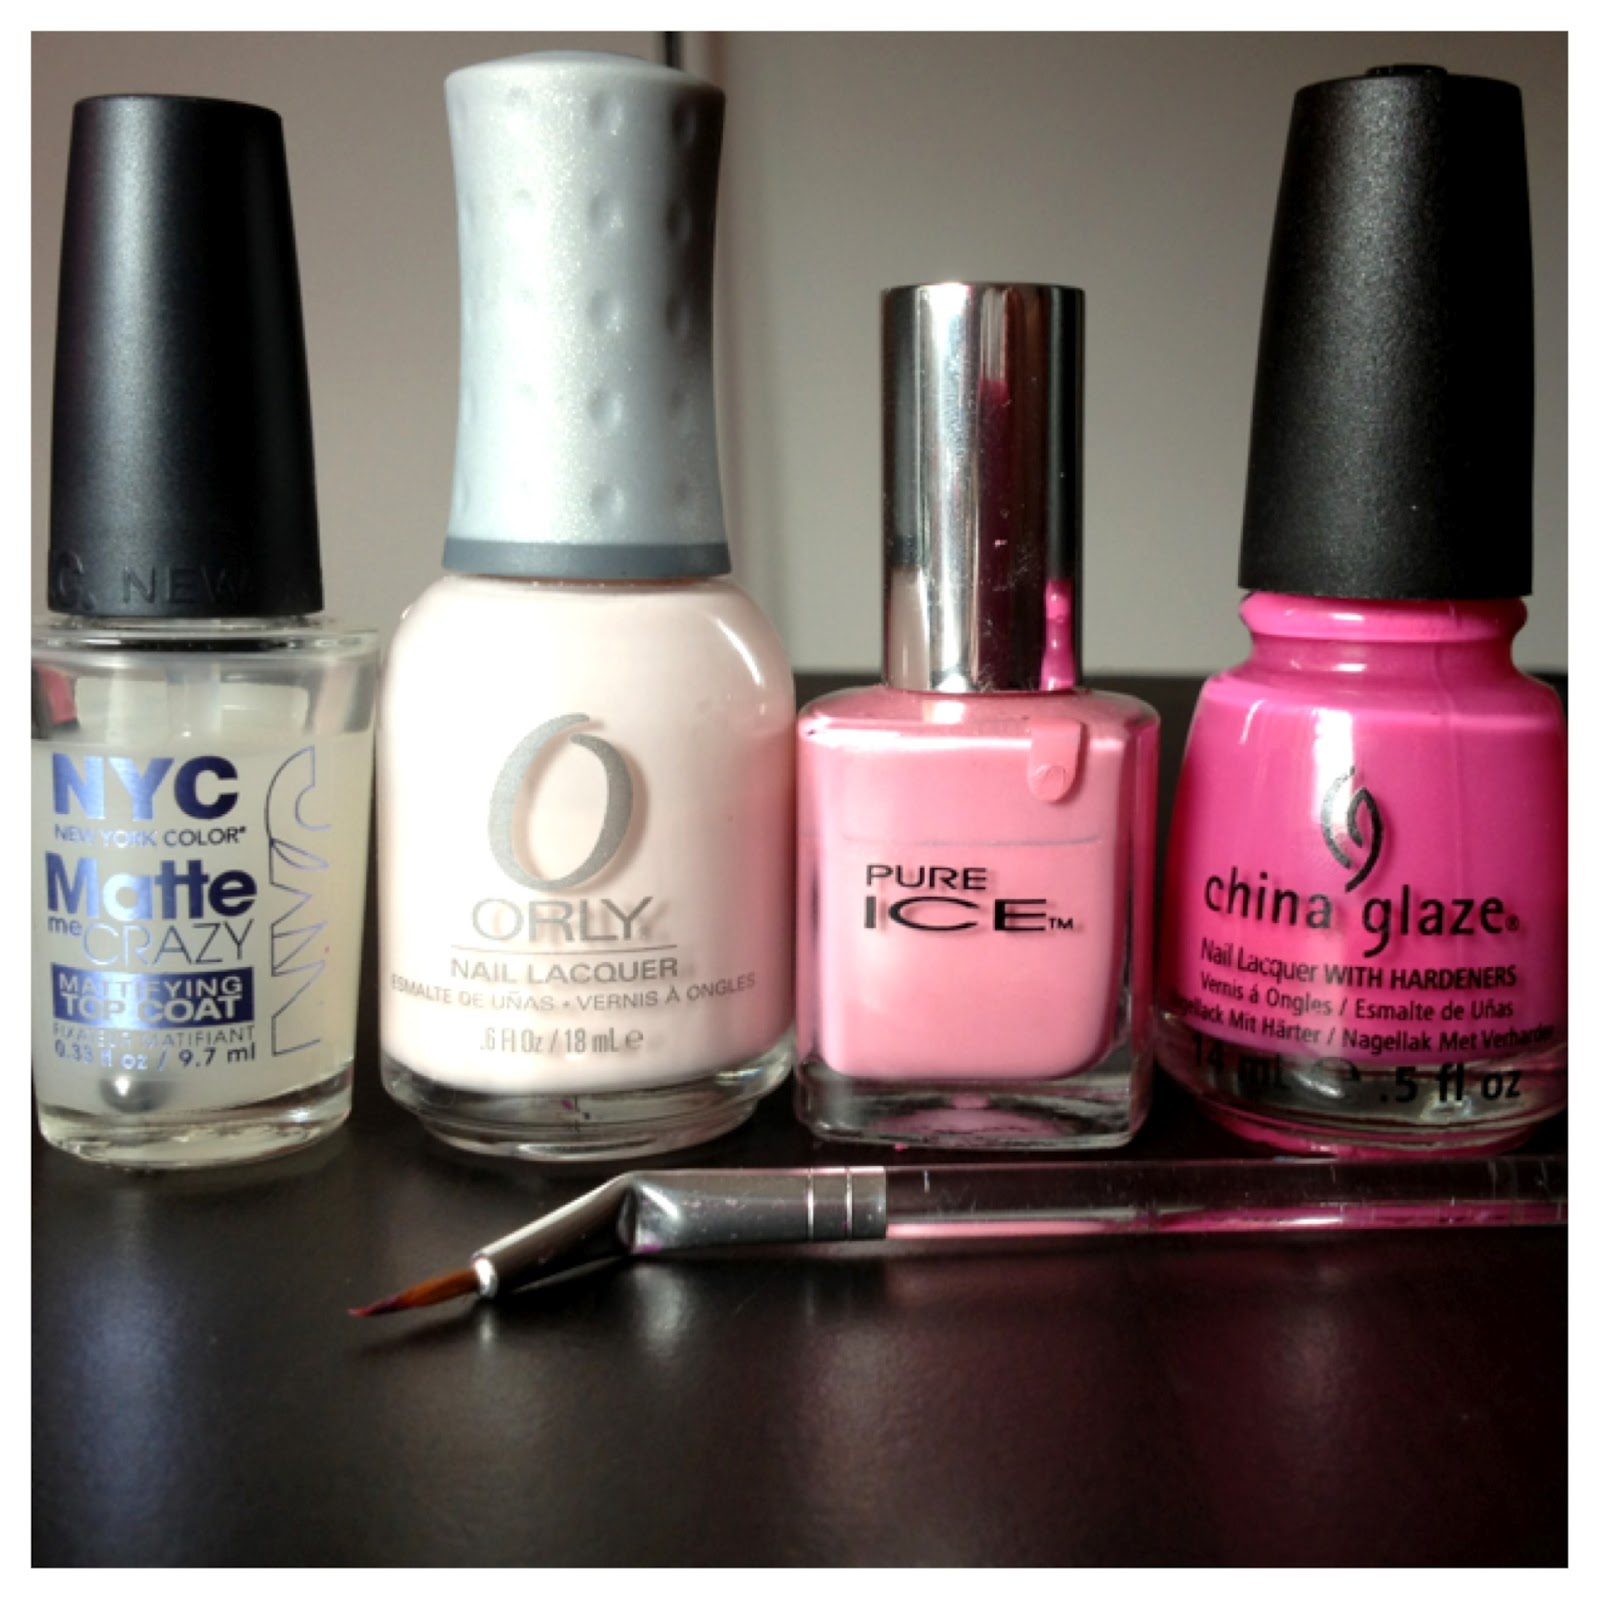
This is what you'll need:


From left to right : NYC- Matte Me Crazy (optional), Orly- Kiss The Bride, Pure Ice- Love and China Glaze- Rich & Famous. I also used a very tiny brush, if you don't have a tiny brush like this, you can use a striper polish.


Step 1: Paint your base color on every nail. I used Pure Ice- Love for my base color. As you can see the application isn't the best. If you run into a problem where the finish isn't as smooth as you'd like it to be, adding a top coat will even everything out for you.


Step 2: For my spots I used Orly- Kiss The Bride. What you want to do is take your paint brush and make small spots in random places on your nail. You want to make sure that your brush doesn't have too much polish on it or you'll end up with globs for spots and you don't want that.


Step 3: If you're using a tiny brush like I am, take your 3rd color and place a few drops onto a piece of paper. Here I'm using China Glaze- Rich & Famous. Dip your brush into the polish.


Step 4: Create a semi-rounded line along one of your spots.


Step 5: Create a 2nd semi-rounded line. You'll want the 2 lines to connect.


Step 6: Create one more line along the bottom of the spot. This time make sure that it doesn't touch your first 2 lines. And there's your spot. Some people prefer to use a dotting tool for this part, some people connect all of the lines. It's personal preference. If you're confused, you can always google a picture of a leopard and mock their print.


Step 7: Now that the first print is done, you'll want to repeat this process with all of your spots. As you can see I've started my first line on my second spot.


Step 8: Create your 2nd line. As you can see I did it a little differently than the first print. My 2 lines are connecting in a downward point. My connecting lines in my first print are in an upward point. You'll want to alternate throughout your spots so they don't look completely uniform.


Step 9: Create your 3rd line, again making sure that it doesn't touch your first 2 lines.


Step 10: Once you've created all of your prints, go ahead and with that same color, add random dots to fill in any open space. You can create these dots with a dotting tool, tooth pick, ball-point pen, whatever you prefer.


Step 11: Once you've completed all of your nails. Add a top coat to seal in your design. Here I used a matte top coat but that's completely optional.


Hope you guys enjoyed this tutorial! As always, feel free to leave any comments/questions below!


Happy Polishing!
Aubrey

Thursday, August 16, 2012

Favorite Nude Lip Products

Let me start off by saying that it's taken me FOREVER to start this blog today! Why? Shark week of course! haha. Talk about addicting television. Anyway....

I decided to show you guys what my favorite nude lip products are. I have some high-end favorites and some low-end favorites. I'll post a link below the pictures in case any of you are interested in buying these products or just want to scope them out.


Here are the products as a whole, (with a fancy filter). If you'd like to know more about each specific product in detail, keep reading!


I'm going to start off with my all-time favorite lipstick. This is MAC- Creme D'Nude. It's a cremesheen finish, so it's a little on the sheer side. This allows you to wear it throughout the day without it looking like you have a heavy night time lipstick on.


Here is a swatch of CD'N. As you can see it has enough pigmentation to nude out your lips, but is very sheer at the same time. You can check out this lipstick here - MAC Cosmetics- Creme D'Nude.


This is Revlon- Soft Nude (070) and it's my second favorite nude shade. It's very similar to CD'N but has a bit of a thicker formula. Besides the fact that the lipstick is nice, the packaging is so cute. As you can see it has a quilted pattern.


Here is a swatch of SN and you can see the comparison between it and CD'N. Very similar. Both have more of a brown/peachy undertone. You can check out this lipstick here - Revlon - Soft Nude (070).


This lipstick is MAC- Viva Glam Gaga 2. It has an amplified finish, a.k.a. this lipstick is so pigmented that you have to be careful using it. If you swipe this lipstick on like any other lipstick, you could very possibly look sickly. I apply it by dabbing it onto my lips (not swiping) and gradually getting the color I desire.


Here is a swatch of VGG2. You can see that the color is much deeper than the first two swatches. They all have brown/peachy undertones. Unfortunately, this specific Viva Glam lipstick isn't sold at MAC anymore. They are no longer selling the Gaga version. They have the new Viva Glams for sale, which is Nicki Minaj/Ricky Martin's version. If this is a shade that you are extremely interested in, I'm sure you can find the shade on eBay.

I will still post a link to MAC's Viva Glam lip products because each product sold helps a great cause. "Every cent of the selling price of VIVA GLAM Lipstick and Lipglass is donated to the M·A·C AIDS Fund to support men, women, and children living with HIV and AIDS."
Here is the link to check it out - MAC Cosmetics- Viva Glam.


This is my least-favorite nude (but it's still a favorite!) It's E.L.F.- Nicely Nude. It's my least favorite for 2 reasons. When I bought this shade offline, it was described as a lighter color than what I received, so right off the bat I was disappointed. It's also my least favorite because I tend to want to wear more of a peachy/brown nude and this definitely has pink undertones.


You can see here how much more pink NN is compared to the other swatches. You can check out this lipstick here - E.L.F. Cosmetics - Nicely Nude.


Onto the lip glosses! This is NARS- Sweet Dreams and it's my absolute favorite. My brother got this for me for my birthday. (he went into Sephora and bought me a $24 lip gloss, if that's not love I don't know what is.) As you can see it has a doe foot applicator which I love.


Here is a swatch of SD. It's perfectly pigmented with a pink undertone and fine gold shimmer. You can check out this lip gloss here - NARS Lip Gloss- Sweet Dreams.


This is Beauty Rush - Slice of Heaven by Victoria's Secret. This gloss is on she sheer side but has beautiful pink/gold shimmers.


This is my go-to nude gloss if I don't want such a pigmented shimmer. You can see how much more sheer it is compared to SD. You can check out this lip gloss here - Beauty Rush - Slice of Heaven.


Last, but certainly not least, my lip underwear a.k.a. lip liner. This is Maybelline - Toast (25). A lot of people are nervous of lip liner because they don't want that ridiculous Pamela Anderson look. What a lot of people don't know is how beneficial lip liner is with your lip stick. Lip liner will give your lips a crisper line, along with longer wear of your lipstick.


Here is a swatch of Toast (T) and it looks a little harsh but I pressed down pretty hard to make sure that the color would show. Not only do I use this underneath my nude lipsticks but sometimes I wear it on its own. It has a beautiful color and its mattifying. So if you're looking for a matte colored lipstick and you can't find one, try looking for your color in a lip liner. It'll last long and it'll look great. You can check out this lip liner here - Maybelline Lip Liner- Toast 25.


I hope you guys enjoyed this post! I know it was long but I really wanted to go into detail for you guys. I hope that the swatches/info was beneficial. As always, feel free to leave any comments/questions below.


Aubrey

Wednesday, August 15, 2012

Pink Glittery Fishtail Manicure

A couple weeks ago I was sent O.P.I.- Nothin' Mousy 'bout It from my friend Tamara (her user name is @ohtammm on Instagram). Ever since I recieved this polish I've been thinking about a manicure that I could do to feature it. This is what I came up with..


Here is a flash shot of the manicure..


Here is a micro shot of the polish..


I love love loveee this polish. The pink/gold/purple glitter is to die for, and the glitter is so fine that the finish reminds me a lot of Essie- Pure Pearlfection. The only con is that the bottle is FULL of hearts, but they are a pain to get out. You'll most likely have to do some manual placement with them.


Here are all of the polishes I used for my mani. From left to right, Pure Ice- Love (don't mind the glob of polish on it haha), China Glaze- Rich & Famous, China Glaze- Purple Panic and O.P.I.- Nothin' Mousy 'bout It.


I hope you guys enjoyed! I didn't do a tutorial today because I've already done a tutorial on the fishtail nails. You can find that tutorial here - Fishtail Manicure Tutorial. For the hearts, all I did was place them on the nail with some tweezers! As always, feel free to leave any comments/questions below!


Aubrey